Classic Domino Web Attachment UI Tricks: Hide the Crude Default with $V2AttachmentOptions, Then Draw Your Own List and Delete
The previous piece covered “how to put a File Upload Control on a web form.” It works — but it usually looks crude: after the user saves, Domino dumps the attachment icons at the very bottom of the page under a horizontal rule; enter edit mode and each attachment sprouts a row of “mark for deletion” checkboxes that are ugly and sit outside your layout.
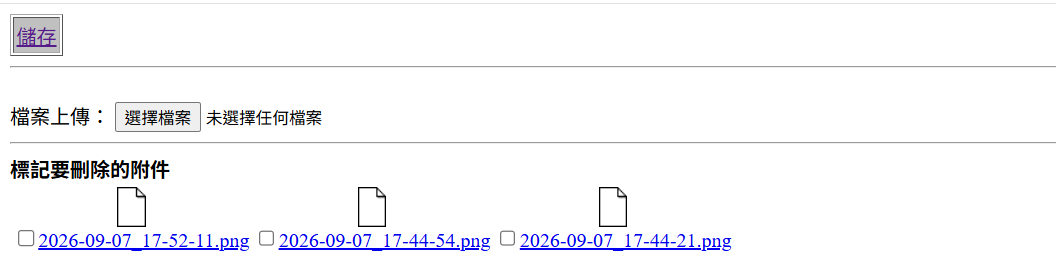
A real web app doesn’t ship that. Classic Domino web development has a whole set of “hide it, redraw it yourself” techniques, and this piece strings the most useful ones together — including that $V2AttachmentOptions field you may have heard of but weren’t sure about.
Note: the core of this topic (
$V2AttachmentOptions,%%Detach) is mostly long-accumulated community knowledge with little current official documentation, so the sections below label what’s official versus community consensus.
TL;DR
- Hide the default: add a text field named
$V2AttachmentOptionsto the form; value"0"= hide all V2 attachments from the web,"1"= show. Only 0/1, no 2 — and it must be the text"0", not a numeric 0 (a number fails silently). - It’s display, not security: hiding ≠ blocking downloads — someone who knows the filename can still fetch it (stated plainly by the community).
- Draw your own download list: a Pass-Thru HTML computed field plus
@AttachmentNamesbuilds links to…/$FILE/name?OpenElement; filenames with spaces need@URLEncode. - Delete is really
%%Detach: the default checkbox row is just Domino auto-emitting<input name="%%Detach">; on submit the web engine deletes the checked files, no agent needed. You can emit your own styled%%Detachcheckboxes too.
First, how the default works: %%File and %%Detach
To redraw it, you first need to know what Domino is doing. Two %%-prefixed reserved names are the key (community writeup):
- Upload: on the web the File Upload Control renders as an
<input type="file">whose name starts with%%File(e.g.%%File.482571b1...$Body...). - Delete: the default “mark attachments for deletion” checkbox row is Domino auto-emitting
<input type="checkbox" name="%%Detach" value="filename">. On submit, the Domino web engine deletes whatever filenames were sent via%%Detach— no agent code required.
This matters: the “built-in delete” isn’t black magic, it’s the %%Detach naming convention. Once you know that, you can emit your own %%Detach checkboxes inside your own layout and still get working deletion (used below).
Step 1: hide the default attachment area with $V2AttachmentOptions
To redraw, first hide Domino’s default lump. Add a text field to the form, named exactly $V2AttachmentOptions (the HCL forum has a community writeup). The long-standing community account: value "0" hides all “V2 style” attachments from web clients, "1" shows them; the Notes client is unaffected and still sees them. Those are the only two values (there’s no “2”). Make the field Computed for Display; the simplest value is just "0" to always hide, or to “hide when reading, show when editing”:
@If(@IsDocBeingEdited; "1"; "0")Two gotchas you must remember:
- Text
"0", not numeric0. The community stresses it repeatedly: when you set this value via a formula or agent, make sure it’s the text “0”, not a numeric 0 — set it to a number and the feature silently does nothing. - This is display, not security. The forum is blunt: “the web user could still download the file attachments if they knew the filenames.” Hiding only removes the icon; it doesn’t stop someone fetching the file by URL. For real access control, use the ACL / Readers fields, not this.
(Also, $V2AttachmentOptions governs the old “V2 style” icon rendering; if the document’s attachments were produced as MIME, the hiding may not be consistent — a community observation, so test with MIME attachments.)
Step 2: draw your own download list (Pass-Thru HTML + @AttachmentNames)
Once hidden, use a Pass-Thru HTML computed field (Computed for display, with Pass-Thru HTML set on the paragraph) plus @AttachmentNames to build your own list of download links. The download URL form is official (URL commands): …/$File/name?OpenElement.
files := @AttachmentNames;@If(files = ""; "(no attachments)"; @Implode( "<a href=\"/" + @WebDbName + "/0/" + @Text(@DocumentUniqueID) + "/$FILE/" + @URLEncode("Domino"; files) + "?OpenElement\">" + files + "</a>" ; "<br>"))Key points:
@AttachmentNamesreturns a list, and formula string concatenation applies element-wise, so that one statement builds an<a>per attachment, joined by<br>via@Implode.- Filenames with spaces or special characters break the link — always
@URLEncode("Domino"; name)them (or the browser can’t fetch). This is the most common trap. - The
0/in the URL is the “by UNID, without a view” shorthand (the official form isView/Document;0is the common substitute).
Now the attachment list lives in your own table/block with your own CSS, not Domino’s bottom-of-page lump.
Step 3: custom delete — two routes
Route 1: emit your own %%Detach checkboxes (no agent). Since deletion rides on %%Detach, draw your own styled row in edit mode with Pass-Thru HTML:
files := @AttachmentNames;@If(files = ""; ""; @Implode( "<label><input type=\"checkbox\" name=\"%%Detach\" value=\"" + @URLEncode("Domino"; files) + "\"> " + files + "</label>" ; "<br>"))The user checks boxes, hits your own save button, and Domino deletes the checked files — the same function as the default, but the look is entirely yours.
Route 2: WebQuerySave agent + Remove (for full control). When you want to validate, audit, or not rely on %%Detach behavior, emit your own field (say a multi-value list of filenames to delete), then in a WebQuerySave LotusScript agent call doc.GetAttachment(name).Remove on each and doc.Save. That backend (GetAttachment / Remove) is covered fully in the site’s LotusScript attachment handling piece, so it isn’t repeated here.
The action bar and save button
One last one: Domino’s auto-generated web action bar and default save chrome are usually ugly too. The classic move is to not use the built-in ones and place your own Pass-Thru HTML <input type="submit"> (or a JavaScript document.forms[0].submit()) as the save button, styled your way. This is more general classic-web practice with no single authoritative source, but it’s the same idea as the rest: turn off what Domino auto-generates and use HTML you control.
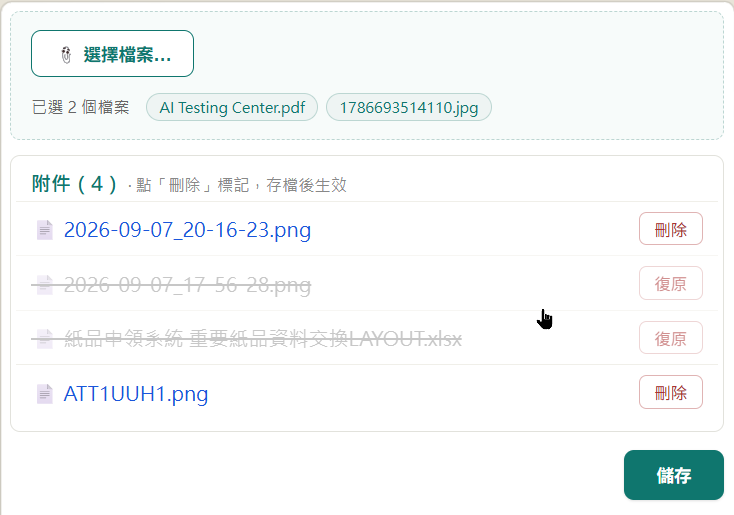
Apply these steps to a real web form and the result looks roughly like this — the footer dump and bare checkboxes are gone, replaced by your own upload area, attachment list with delete, and a custom save button (this is a live Domino web screen; the download list, $V2AttachmentOptions, and %%Detach are the techniques covered here, with a little extra CSS and a small amount of front-end JS to further polish the upload and delete interactions):
Wrap-up
Classic Domino web attachment UI is crude because Domino auto-renders a lump you can’t control. Three steps to take it over: $V2AttachmentOptions="0" (text zero; hides only, doesn’t block) to hide the default → Pass-Thru HTML plus @AttachmentNames (remember @URLEncode on names) to draw your own download list → your own %%Detach checkboxes, or WebQuerySave + Remove, for custom delete. Most of this is long-accumulated community lore with little current official documentation, but it’s in daily use maintaining older Domino web apps. For the basics of placing the upload control, see the three upload methods; for multi-file and batch delete, see this piece.
Sources
- $V2AttachmentOptions — HCL Domino developer forum (community)
- URL commands for opening image files, attachments, and OLE objects — HCL Domino Designer (official)
- Quick tip: Domino File Upload Control (%%File / %%Detach, community) — notesweb2
- How to hide attachments in hide-whens (community) — DominoPower