
File Attachments in Domino Three Ways: Notes Client, Classic Web Form, and XPages
How easy is attaching a file in the Notes client? Open a document, drag the file into a rich text field, let go. Done. So easy you wouldn’t call it a “feature.”
But the same need stops being self-evident the moment the scene changes. The boss says “this form needs to accept uploads in the browser too,” or you’re rewriting the app in XPages — and now “how do users upload a file” isn’t one answer, it’s three: one for the client, one for a classic web form, one for XPages.
The good news is that all three roads lead to the same place. Understand that “same place” and the three contexts tie together.
TL;DR
- Three front ends, one storage: whether the user uploads from the client, a web form, or XPages, the file ends up as an attachment on a rich text field of the document (in LotusScript, a
NotesEmbeddedObject). - Client: a rich text field accepts attachments natively — drag one in or use the menu, no code.
- Classic web form: use an embedded element — the File Upload Control (
Create - Embedded Element - File Upload Control), which is a web-only control. - XPages: use
xp:fileUploadto upload andxp:fileDownloadto list and download, both bound to the same rich text field. - The backend is shared: because everything lands in a rich text field, the LotusScript to list, extract to disk, and delete is identical across all three — the site’s LotusScript attachment handling piece already walks it.
The common ground: an attachment is an embedded object on a rich text field
Get the “same place” straight first, and the three contexts fall into line.
In Domino, an attachment isn’t a loose file sitting somewhere on the document — it’s a NotesEmbeddedObject hanging off a rich text field. The official definition of that class covers three things: “An embedded object, An object link, A file attachment.” An attachment is one of them (Type = EMBED_ATTACHMENT). Its data is stored apart from the rich text content, but logically it lives under that field.
That’s also why you can pull an attachment out over a single URL in the browser — Domino serves it under the $File element name:
http://Host/Database/View/Document/$File/Filename?OpenElementHold that model: there are three upload front ends, but the destination is always “an attachment on some rich text field.” The three sections below are really three entrances to the same thing.
Notes client: a rich text field, just drag it in
There’s nothing to teach on the client path, and that’s the point — a rich text field accepts attachments natively. In edit mode the user drags a file into the rich text field, or attaches it from the menu, and it’s on — without you writing a line of code. That’s the “so easy it isn’t a feature” from the opening.
To do it in code (say, to auto-attach a generated report), you reach for NotesRichTextItem.EmbedObject:
Dim rt As NotesRichTextItemSet rt = doc.GetFirstItem("Body")Call rt.EmbedObject(EMBED_ATTACHMENT, "", "C:\reports\Q3.pdf") ' EMBED_ATTACHMENT = 1454Call doc.Save(True, False)EmbedObject, in the docs’ words: “Attaches the file you specify to a rich text item.” The first argument is EMBED_ATTACHMENT (value 1454), the second (class$) is an empty string for attachments, the third is the file to attach. How you then list, extract, and remove attachments is covered fully in the site’s LotusScript attachment handling piece, so it isn’t repeated here.
Classic web form: the File Upload Control
Put that same form in a browser and “drag into a rich text field” is off the table — the browser has no such interaction. What Domino gives a classic web form is an embedded element: the File Upload Control.
Two prerequisites (the docs list them): the control is web-only — not supported in the Notes client (the docs: “The file upload control is not supported in Notes”), and the server administrator must configure a temp directory, or attachments won’t save with the document.
The official Designer steps are five:
- Open the form you want to add the upload control to.
- Move the cursor to where the upload box should appear.
- Create - Embedded Element - File Upload Control — create the embedded element from the menu.
- Select the control, right-click to open the File Upload Control Properties box.
- On the Hide tab, check “Hide paragraph from Notes® R4.6 or later” — since it’s web-only, hide it from the Notes client while you’re there.
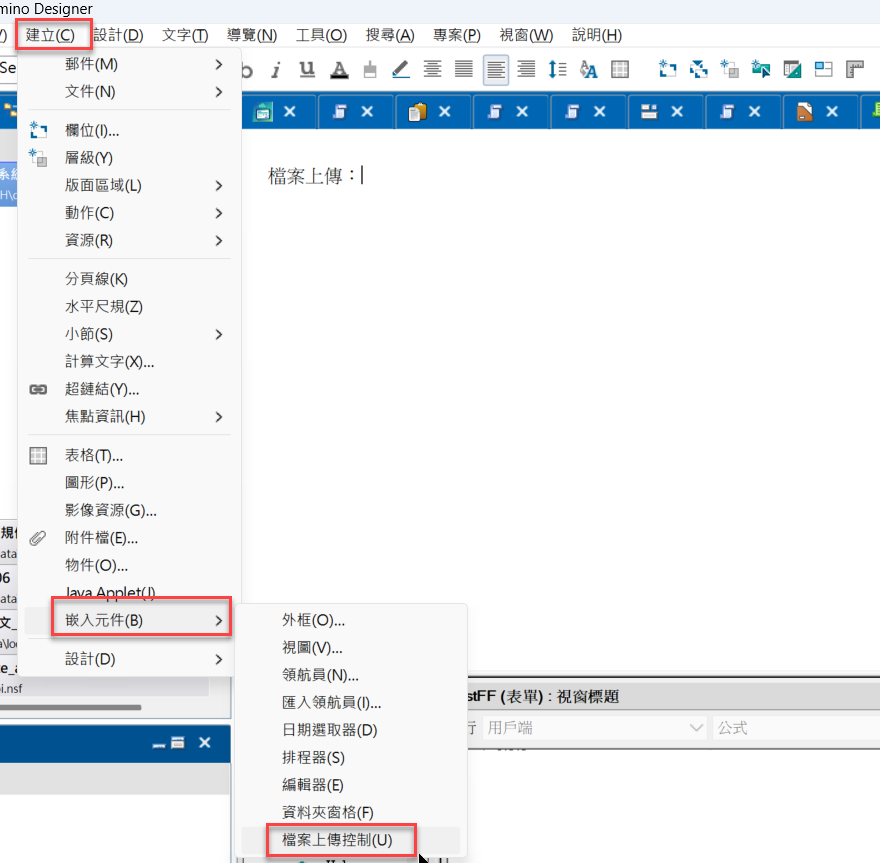
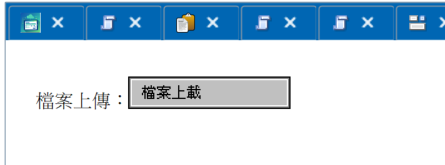
Once placed, a Web user in edit mode can type the path and file name or click a browse button to pick a file; on submit the file becomes an attachment on the document (the same model as the client).
To process the upload server-side (validate, rename, move to another field, notify), hang a WebQuerySave agent on the form and use the exact same backend API as the client — doc.HasEmbedded, doc.GetAttachment(name), the rich text field’s EmbeddedObjects, ExtractFile. As for letting users download an attachment back, that’s a $File URL — a commonly needed, commonly misremembered one, so it gets its own section below.
XPages: xp:fileUpload with xp:fileDownload
XPages splits upload and download into two core controls used as a pair — and, crucially, both bind to the same rich text field of the document.
xp:fileUpload: the docs define it as “Uploads a file from the local file system.” Itsvalue“binds a control to a data element or other value which must be of type rich text” — i.e. a rich text field.xp:fileDownload: “Downloads a file to the local file system.” Bound to the same rich text field, it lists the attached files for the user to click and download;rowssets how many rows to show, andallowDeletedecides whether users can delete attachments.
The typical shape is both controls on one XPage, value pointing at the same rich text field of the same document data source:
<xp:fileUpload id="fileUpload1" value="#{document1.body}" />
<xp:fileDownload id="fileDownload1" value="#{document1.body}"    rows="30" allowDelete="true" />
When the user picks a file and saves the document, xp:fileUpload attaches it to the body rich text field; xp:fileDownload reads the list from that same field, offering download and (with allowDelete) removal. Binding both to the same field is what makes them the same set of attachments — and it’s the easiest thing to wire wrong on the XPages path.
Getting an attachment back: the $File download URL
Because all three front ends store the same kind of attachment, “how do I download it” also has one common answer: point a URL straight at the attachment. The form is:
http://Host/Database/View/Document/$File/Filename?OpenElementThe official example looks like this:
http://www.lotus-10.com/lproducts.nsf/By+Part+Number/SN156/$File/spec.txt?OpenElementSegment by segment:
- Host: the server address (
www.lotus-10.com). - Database: the NSF file name or path (
lproducts.nsf). - View: a view name, used to locate the document (
By+Part+Number; spaces in the name become+in the URL). - Document: the key that identifies the document within that view (
SN156in the example; in practice the document’s UNID is also common). $File: the fixed marker that tells Domino “what I want is an attachment.”- Filename: the attachment’s file name (
spec.txt). ?OpenElement: the command that tells Domino to serve the element.
One important, easily-missed caveat: the docs themselves say this kind of URL “makes it impractical to create these URLs manually” — hand-typing it is error-prone, so in practice you generate it in code rather than expecting users to memorize it. How each context gets the URL:
- XPages: you don’t build it yourself —
xp:fileDownloadgenerates a download link for each attachment, and the user clicks the file name to download. - Classic web / LotusScript: build the URL from the document’s own data (view + document key/UNID + file name) and drop it into the page or a computed field for the user to click.
- Notes client: double-click the attachment to open or save it — no URL needed; this is for the browser-fetch case.
The same attachment is reachable through this URL no matter which front end uploaded it — because the destination is always an attachment on the same rich text field.
The three contexts at a glance
| Upload mechanism | Bound to | Delete | Backend processing | |
|---|---|---|---|---|
| Notes client | rich text field (drag / menu attach) | rich text field | delete in the client | shared (7/07 piece) |
| Classic web form | File Upload Control (embedded element, web-only) | attaches to the document | WebQuerySave / URL | shared |
| XPages | xp:fileUpload | rich text field (value) | xp:fileDownload’s allowDelete | shared |
The “upload mechanism” column differs three ways, but the last column is the same — because the destination is always an attachment on the same rich text field.
What about Java and SSJS?
On the Java side this maps to RichTextItem and EmbeddedObject (the same “an attachment is an embedded object on a rich text item” model, with method names that line up). The XPages / SSJS side doesn’t use a class for this — it uses the two controls above (xp:fileUpload / xp:fileDownload) bound to a rich text field.
Wrap-up
“How do users upload a file” has three entrances in Domino: the client’s rich text field (native, easiest), the classic web form’s File Upload Control (a web-only embedded element), and XPages’ xp:fileUpload + xp:fileDownload (bound to the same rich text field). Three front-end mechanisms, one destination — an attachment on a rich text field of the document. Which is why the LotusScript to list, extract, and delete afterward is one shared set across all three; the details of that set are in LotusScript attachment handling. For a deeper look at the rich text field itself, see Getting started with NotesRichTextItem.
Sources
- EmbedObject method (NotesRichTextItem) — HCL Domino Designer 14.5
- Creating a file upload control (classic web) — HCL Domino Designer 14.5
- File Upload control (xp:fileUpload) — HCL Domino Designer 14.5 XPages
- File Download control (xp:fileDownload) — HCL Domino Designer 14.5 XPages
- URL commands for opening image files, attachments, and OLE objects — HCL Domino Designer 14.5